WordPress For Non-WordPress Developers
Learning WordPress development today can be really overwhelming. It's a project with lots of history, and has been around for over 20 years now. There's tons of resources online to learn how to develop for WordPress, but it's hard to get a sense of direction with the crazy amounts of content that exist for this software.
This article exists to help understand the WordPress ecosystem from the perspective of someone who already knows web development with HTML, CSS, JavaScript, etc. This is less of a WordPress development tutorial, and more like a roadmap, where I point out the many different things that exist within WordPress so that you can start to figure out how to create content for the world's most popular website builder.
- WordPress.com vs WordPress.org
- Installing WordPress
- Page Builders
- The Block Editor
- Plugins
- Additional CSS
- Your First Plugin
- Elementor Widget Development
- Internationalization
- Pluralization
- Block Development
- Child Themes
- Making Your Own Theme
- Coding Standards
- Custom Post Types
- Custom Fields
- Headless WordPress
WordPress.com vs WordPress.org
If you didn't already know, WordPress.com and WordPress.org aims to do two different things. WordPress.com lives in the same space as Squarespace, Wix, and Webflow. They offer website hosting and ways to build your website quickly from a selection of pre-built templates. Users edit their websites visually by dragging and dropping elements.
WordPress.org gives you the WordPress software, which is can be ran on a server host, or locally on a desktop machine. If you're reading this article, this is what you should be looking at. WordPress is licensed under the GPL, meaning it's free (as in both beer and freedom), open source software.
Installing WordPress
Many guides, especially YouTube tutorials, start off by having you purchase website hosting. Don't do this! Well, not at first. When you're just starting off with WordPress, you can use a local server to run the software on your own computer. Here are some examples of local server programs:
Local, XAMPP, and Docker are available on Windows, macOS, and Linux. Laragon is only built for Windows.
There also exists InstaWP, which is a service lets you create temporary WordPress websites in the browser. They offer a free plan that gives you up to 3 WordPress websites at a time.
Page Builders
Page builders are WordPress plugins that let you build webpages by dragging and dropping blocks, sections, and text. You'll probably want to spend some time learning at least one page builder, just to understand how people create websites without ever opening a text editor.
The most popular page builder by far is Elementor. It's free, there's lots of resources for using Elementor, and it's a very mature tool.

Of course, other page builders exist. Here's a few examples:
- Bricks: For advanced developers. Not shy to expose HTML elements and CSS attributes.
- Oxygen: Aimed for advanced users just like Bricks, but more mature.
- Breakdance: Made by the same team behind Oxygen. Simpler to use.
- Beaver Builder: Similar to Elementor. Less popular, but better performance.
- Divi: Marketed towards clients/designers that aren't as tech savvy as programmers.
- WPBakery: A page builder that's been around for a long time.
The Block Editor
WordPress version 5.0 introduced the block editor, aka Gutenberg. Like Elementor, Gutenberg users drag and drop blocks to edit their webpages. The block editor generally performs better compared to Elementor. The editing experience is faster, and it typically produces less DOM elements on the front-end.
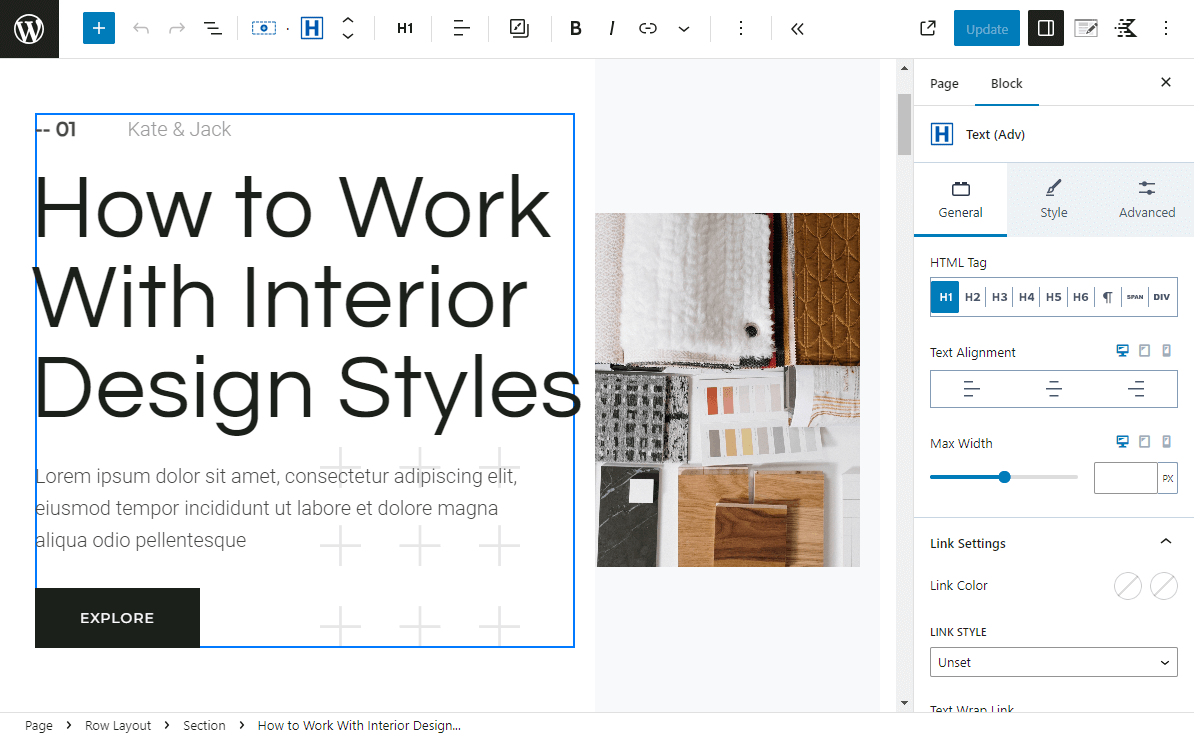
At the time of writing this article, WordPress is heading in a direction that sees the block editor combined with Full Site Editing (FSE), where templates and blocks are shared across different parts of the website, not just restricted to pages. Themes that take advantage of FSE include Ollie, Frost, and the default theme that comes with WordPress, Twenty Twenty-Three.
Block plugins adds extra blocks to Gutenberg. Some of them add multiple blocks that page builders usually have out of the box such as flexbox containers and grids sections. When installing some popular themes, you'll might find that the theme promotes a block plugin that works well with the theme. Here are a few block theme/plugin parings:
| Theme | Plugin | Description |
|---|---|---|
| Astra | Spectra | Very popular. Large collection of blocks and promotes a selection of starter templates. |
| Kadence | Kadence Blocks | Similar to Astra + Spectra. Performs a little better on the front-end. |
| Blocksy | Stackable | Richer editing experience at the cost of performance. |
| GeneratePress | GenerateBlocks | Focuses on being lightweight, speedy, yet powerful. |
You can also author their own blocks with JavaScript and React. I'll explain how to create your own Gutenberg blocks later in the article.
Plugins
WordPress has lots and lots of plugins to extend and modify the behavior of your website. Here are some examples:
| Category | Examples |
|---|---|
| Analytics | Koko Analytics, Site Kit by Google, MonsterInsights |
| Backup/Migration | UpDraft, All in One WP Migration, Duplicator, WPVivid, WP Migrate |
| Content Types | ACF, Meta Box, Pods, Custom Post Type UI, TaxoPress, Carbon Fields |
| Forms | WPForms, Forminator, Gravity Forms, Contact Form 7 |
| Image Optimization | Smush, EWWW, Imagify, WebP Express |
| Multilingual | Polylang, Weglot, WPML |
| Performance | WP Super Cache, Autoptimize, WP Rocket, Perfmatters, W3 Total Cache, LiteSpeed Cache, Ngnix Helper, Redis Object Cache |
| SEO | The SEO Framework, Yoast SEO, Rank Math, All in One SEO |
| SMTP | WP Mail SMTP, FluentSMTP, MailPoet |
| Security | WordFence, iThemes Security, All In One WP Security |
| Others | FileBird, WPCode, Jetpack, WooCommerce |
Plugins are really cool, but too many plugins can slow down a site and can increase the likelihood of a security vulnerability. If you find yourself struggling with bloat, here are some ways you can reduce the use of plugins:
- A crude backup method is to make a copy of the WordPress directory and run
mysqldumpon the database. - If you have control over images, process them before uploading to the website with Photoshop or GIMP.
- Depending on your hosting solution, use fail2ban, Cloudflare's firewall, and
web server configuration (
.htaccess,nginx.conf) to secure your website. - If your block/widget plugin includes form components, you might not need a form plugin.
Additional CSS
After getting familiar with page builders, the block editor, common plugins, and themes, it's time to finally start coding for WordPress.
Adding CSS to your website is pretty simple. If you're using any of the themes listed above (GeneratePress, Astra, Kadence), or any other theme that doesn't use the FSE features (Hello Elementor), then it's likely that you have the option to add Custom CSS in the Customizer. You can find the Customizer by going to Appearance > Customize in the admin dashboard.
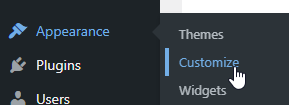
From there, find the Additional CSS section. You should be presented with a text area to insert your own CSS code.
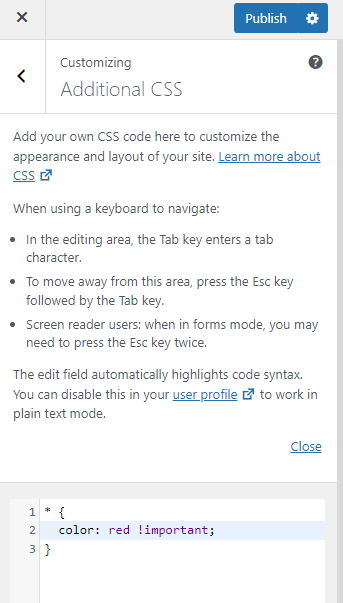
Use this area to augment an already existing website built with visual WYSIWYG editors. It's not suitable to style an entire website in this section. For that, you might want to look at making your own theme.
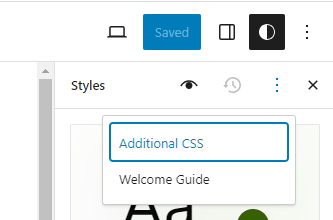
If you're using FSE, you'll find Additional CSS hiding under the Styles section in the block editor.
Your First Plugin
Navigate to your site's plugin folder. It should be located under
wp-content/plugins from the root of the WordPress installation. Create a
folder called my-plugin, and then inside the new folder, create a file
called my-plugin.php. WordPress expects plugin metadata in a form of a
comment at the top of the PHP file:
<?php
/**
 * Plugin Name: My Plugin
 * Version: 0.1.0
 * Text Domain: my-plugin
 */
Save the file. You should be able to see "My Plugin" in the Plugins screen. Activate it.
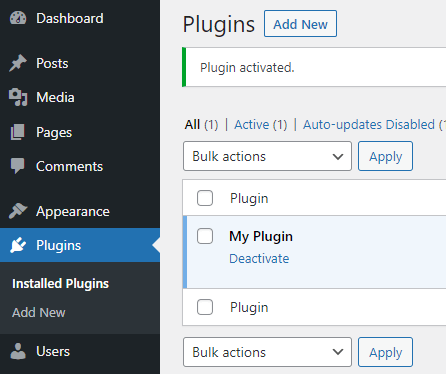
Let's disable the block editor.
add_filter( 'use_block_editor_for_post', 'my_plugin_use_block_editor' );
function my_plugin_use_block_editor() {
  return false;
}
Changing how WordPress behaves is done through hooks. Hooks come in two flavors: filters and actions. Filters usually go through a callback function that returns a value, while actions typically perform some side effect.
Whenever WordPress checks if a post type can use the block editor, it uses the
use_block_editor_for_post filter to run the my_plugin_use_block_editor
callback function. Since it always returns false, we've effectively
disabled Gutenberg. Edit any page and you'll find that Gutenberg has been
replaced by the classic editor.
Turns out that WordPress provides developers a function that
always returns false,
so we'll use that instead:
add_filter( 'use_block_editor_for_post', '__return_false' );To demonstrate action hooks, we'll add Google Analytics to the website:
<?php

add_action( 'wp_head', 'my_plugin_add_google_analytics' );
function my_plugin_add_google_analytics() {
  ?>
  <script async src="https://www.googletagmanager.com/gtag/js?id=G-XXXXXXXXXX"></script>
  <script>
    window.dataLayer = window.dataLayer || [];
    function gtag(){dataLayer.push(arguments);}
    gtag('js', new Date());
    gtag('config', 'G-XXXXXXXXXX');
  </script>
  <?php
}
Whenever WordPress renders the front-end of the website, it will go through
several different hooks, one of them being wp_head. In this example, the
action performs a side effect, printing out the script tags into the
website's <head> tag.
The Plugin Handbook goes over plugin development in detail.
Elementor Widget Development
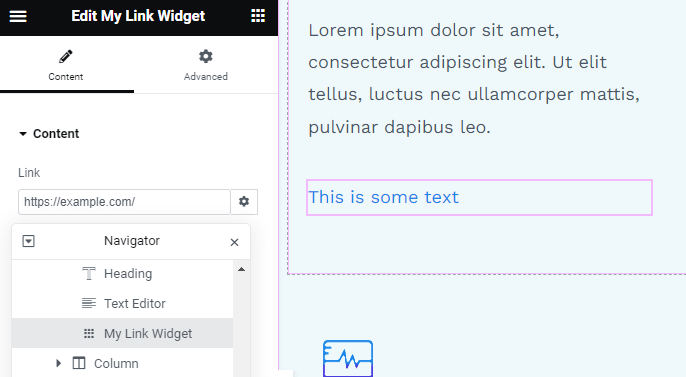
Below is a custom Elementor widget which displays an anchor tag.
<?php
class My_Link_Widget extends \Elementor\Widget_Base {
  public function get_name() {
    return 'my_link_widget';
  }

  public function get_title() {
    return __( 'My Link Widget', 'my-plugin' );
  }

  protected function register_controls() {
    $this->start_controls_section( 'content_section', array(
        'label' => __( 'Content', 'my-plugin' ),
        'tab' => \Elementor\Controls_Manager::TAB_CONTENT,
    ) );

    $this->add_control( 'link', array(
        'label' => __( 'Link', 'my-plugin' ),
        'type' => \Elementor\Controls_Manager::URL,
    ) );

    $this->end_controls_section();
  }

  protected function render() {
    $settings = $this->get_settings_for_display();
    $this->add_link_attributes( 'link', $settings['link'] );
    ?>
    <a <?php echo $this->get_render_attribute_string( 'link' ); ?>>
      <?php esc_html_e( 'This is some text', 'my-plugin' ); ?>
    </a>
    <?php
  }
}
Save the contents to widgets/my-link-widget.php. Inside my-plugin.php, you
can register the widget by using the elementor/widgets/register action:
add_action( 'elementor/widgets/register', 'my_plugin_register_new_widgets' );
function my_plugin_register_new_widgets( $widgets_manager ) {
  require_once( __DIR__ . '/widgets/my-link-widget.php' );
  $widgets_manager->register( new My_Link_Widget() );
}
Go ahead and edit a page with Elementor. You should be able to find "My Link Widget" in the Elements section. Drag and drop it somewhere in the page and you'll see a link that says "This is some text".
Learn more about Elementor development by visiting the Elementor Developer Docs.
Internationalization
You might be wondering about the __ and esc_html_e functions used in the
Elementor widget. These are escaping and internationalization (i18n) functions
provided by WordPress. Whenever you write English text in code, wrap the text
using one of the i18n functions to support multiple languages.
__( $text, $domain = 'default' ) is the most basic i18n function. It returns
the translated form for $text. Translators would use a tool such as
Poedit to convert the English $text into another
language. Even though the $domain parameter is optional, you'll want to
always provide your plugin's text domain, which is determined by the header
comment in my-plugin.php.
esc_html_e( $text, $domain = 'default' ) is a combination of echo,
esc_html, and __. echo outputs a string and esc_html removes any
special HTML characters.
esc_html_e( 'Submit Form', 'my-plugin' );
// and
echo esc_html( __( 'Submit Form', 'my-plugin' ) );
// are the same
You can support multiple languages outside of plugins and themes by using Polylang, WPML, or Weglot. These solutions let you translate posts, pages, taxonomies, etc. Read the WordPress handbook for more info on escaping data and internationalization.
Pluralization
Pluralization is done through the function, _n( $single, $plural, $number, $domain = 'default' ). It takes the single/plural forms as strings, a
number, and a text domain. It returns either the single or plural form
depending on the number given.
$str = _n( 'Added %d review.', 'Added %d reviews.', $review_count, 'my-plugin' );The _n function is not suitable for displaying one or many items. Languages
like Russian use the singular form when $review_count is 1, 21, 31, etc. If
you want to specifically handle one item, add a branch.
if ( 1 === $review_count ) {
  $str = __( 'Review added.', 'my-plugin' );
} else {
  // translators: %d review count number.
  $str = _n( 'Added %d review.', 'Added %d reviews.', $review_count, 'my-plugin' );
}
Block Development
Call register_block_type during the init action to add your own custom
blocks.
add_action( 'init', 'my_plugin_register_blocks' );
function my_plugin_register_blocks() {
  register_block_type( __DIR__ . '/build/hello-block' );
}
You'll need Node.js to create blocks. Install @wordpress/scripts as a
development dependency:
npm install @wordpress/scripts --save-devThe Block Editor Handbook
uses the @wordpress/create-block package to create the necessary files for a
block, but I'll demonstrate how to create a block without it.
From the root of your plugin's directory, create a src directory, and
navigate to it. Create another directory called hello-block. Inside
hello-block, make a new file called block.json.
{
  "$schema": "https://schemas.wp.org/trunk/block.json",
  "apiVersion": 3,
  "name": "my-plugin/hello-block-editor",
  "version": "0.1.0",
  "title": "Hello Block Editor",
  "attributes": {
    "message": {
      "type": "string",
      "source": "text",
      "selector": "h2"
    },
    "title": {
      "type": "string",
      "source": "attribute",
      "selector": "h2",
      "attribute": "title"
    }
  },
  "editorScript": "file:./index.js"
}
When we build the block, new files will be created in build/hello-block. The
directory will contain a block.json file, which is a copy of the
block.json that we created, and an index.js, which will be built from our
index.jsx file. Next to block.json, create index.jsx with the following
content:
import { registerBlockType } from '@wordpress/blocks';
import { __ } from '@wordpress/i18n';
import { PanelBody, TextControl } from '@wordpress/components';
import {
  useBlockProps,
  InspectorControls,
  RichText,
} from '@wordpress/block-editor';
import metadata from './block.json';

registerBlockType( metadata.name, {
  edit: Edit,
  save,
} );

function Edit( { attributes, setAttributes } ) {
  return (
    <>
      <InspectorControls>
        <PanelBody title={ __( 'Settings', 'my-plugin' ) }>
          <TextControl
            label={ __( 'Title', 'my-plugin' ) }
            value={ attributes.title }
            onChange={ ( title ) =>
              setAttributes( { ...attributes, title } )
            }
          />
        </PanelBody>
      </InspectorControls>
      <RichText
        tagName="h2"
        placeholder={ __( 'Your text here', 'my-plugin' ) }
        title={ attributes.title }
        value={ attributes.message }
        onChange={ ( message ) =>
          setAttributes( { ...attributes, message } )
        }
        { ...useBlockProps() }
      />
    </>
  );
}

function save( { attributes } ) {
  return (
    <RichText.Content
      tagName="h2"
      title={ attributes.title }
      value={ attributes.message }
      { ...useBlockProps.save() }
    />
  );
}
registerBlockType creates a new block with the metadata inside block.json
by using the block's name. edit is a function that's used whenever the user
is interacting with the block in the editor. save is a function that runs
whenever the user saves the page and stores the content in the database,
producing plain HTML. Here is an example of what save can output:
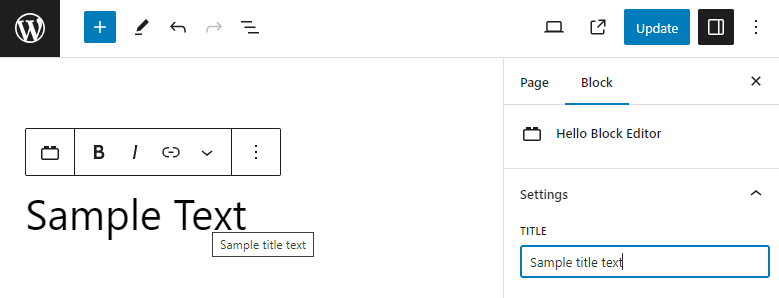
<h2 title="Some title text">Some Text</h2>The RichText component allows users to change the block's text within the
h2 element itself. You can allow the user to change the title attribute in
the style sidebar by using the InspectorControls component.
Both edit and save functions should produce the same HTML markup. The
difference between the two is that edit is interactive, where users can
change the block's data on the fly by using the settings sidebar and toolbar,
while save is used to display content on the front-end and cannot have side
effects.
The plugin folder should look something like this:
my-plugin.php
package-lock.json
package.json
src
└───hello-block-editor
        block.json
        index.jsx
Go ahead and run npx wp-scripts build to populate the build directory. If
you don't have access to the WordPress installation, you can create a zip
file of the block plugin with npx wp-scripts plugin-zip, where you can then
upload your plugin from the admin dashboard. Edit a page and insert
the "Hello Block Editor" component onto the page.
Child Themes
Child themes extend an existing (parent) theme, allowing you to add and change the theme without directly modifying the parent theme's source code. This is suitable for making larger changes to the website's style unlike the Additional CSS section from earlier in the article. Much like plugins, WordPress expects a block comment containing metadata for your theme, only this time, the comment is located in a CSS file.
/**
 * Theme Name: Kadence Child
 * Template: kadence
 * Text Domain: kadencechild
 */
You can save the file in wp-content/themes/kadencechild/style.css. Depending
on the parent theme, you might need to let WordPress know that you want to
use the style.css file in the front-end. Create a functions.php file next
the CSS file and use the wp_enqueue_scripts action to add the style sheet.
<?php

add_action( 'wp_enqueue_scripts', 'kadencechild_enqueue_styles' );
function kadencechild_enqueue_styles() {
  wp_enqueue_style( 'kadencechild-style', get_stylesheet_uri(), array( 'kadence-content' ), '0.1.0' );
}
Making Your Own Theme
When looking into theme development, you'll find that the term "starter theme" shows up time and time again. Starter themes are code templates that help you develop your own themes.
A very popular starter theme is called _s, aka underscores. It contains minimal styling, suitable for starting a theme from scratch. However, _s is not actively maintained anymore. Another popular starter theme is Sage, which provides a more modern take on WordPress theme development by leveraging Tailwind CSS and Laravel Blade. While you could use a starter theme, I think that starting from ground zero is the best way to learn how WordPress themes work.
Your theme can start its life with a style.css file:
/**
 * Theme Name: Handmade
 * Version: 0.1.0
 * Text Domain: handmade
 */
...and an index.php file, that displays post content through The Loop:
<?php get_header(); ?>

<?php if ( have_posts() ) : ?>
  <h2><?php esc_html_e( 'Blog Posts', 'handmade' ); ?></h2>

  <?php while ( have_posts() ) : ?>
    <?php the_post(); ?>
    <div>
      <time datetime="<?php echo esc_attr( get_the_date( DATE_W3C ) ); ?>">
        <?php the_date(); ?>
      </time>
      <h3>
        <a href="<?php the_permalink(); ?>"><?php the_title(); ?></a>
      </h3>
      <?php the_excerpt(); ?>
    </div>
  <?php endwhile ?>
<?php endif ?>

<?php
get_footer();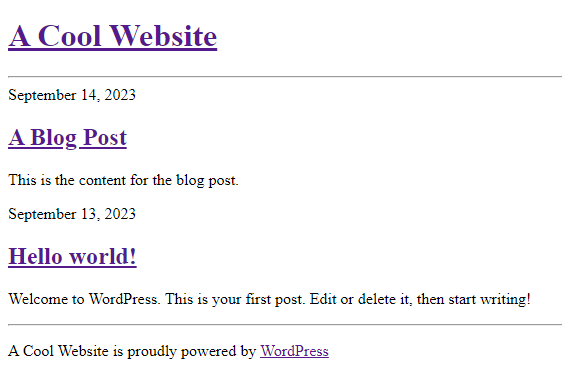
From here, you can refer to underscores to see what kind of files WordPress expects from a theme, and what kind of content goes into each file.
Coding Standards
When developing for WordPress, you should consider following the WordPress Coding Standards. The rules include, but are not limited to:
- Tabs for indentation (boo!)
- Single quote instead of double quotes for strings
- Variables written in snake_case rather than camelCase
- Single space between parentheses
array()instead of[]'value' === $strrather than$str === 'value'(Yoda conditions)<?php echo ... ?>instead of<?= ... ?>- Strings escaped with
esc_html,esc_attr, etc - No direct database access
To check your PHP code, install the WordPress standards for
PHP_CodeSniffer.
After installing PHP_CodeSniffer and the WordPress rules, run phpcs in your
project's directory to check for errors, and run phpcbf to fix them. You'll
want a phpcs.xml.dist file in the root of your project for those commands
to work:
<?xml version="1.0"?>
<ruleset name="WordPress Standard">
  <arg value="ps"/>
  <arg name="basepath" value="./"/>
  <arg name="parallel" value="8"/>
  <arg name="extensions" value="php"/>
  <file>.</file>
  <exclude-pattern>/vendor/*</exclude-pattern>
  <exclude-pattern>/node_modules/*</exclude-pattern>
  <exclude-pattern>/build/*</exclude-pattern>

  <rule ref="WordPress"/>

  <rule ref="WordPress.WP.I18n">
    <properties>
      <property name="text_domain" type="array" value="my-text-domain"/>
    </properties>
  </rule>

  <config name="minimum_supported_wp_version" value="6.3"/>

  <rule ref="WordPress.NamingConventions.PrefixAllGlobals">
    <properties>
      <property name="prefixes" type="array" value="my-text-domain"/>
    </properties>
  </rule>
</ruleset>
To check CSS and JavaScript code, you can use wp-scripts lint-style and
wp-scripts lint-js. To fix CSS and JavaScript linting errors, run
wp-scripts format.
Custom Post Types
Going beyond blogs and brochure websites is when WordPress becomes really powerful. You can use custom post types to group and reuse related content, such as services, local events, courses, webinars, recipes, construction projects, conference talks, staff members, etc.
add_action( 'init', 'my_theme_add_post_types' );
function my_theme_add_post_types() {
  register_post_type(
    'events',
    array(
      'show_ui'   => true,
      'menu_icon' => 'dashicons-calendar',
      'supports'  => array( 'title', 'editor', 'revisions' ),
      'labels'    => array(
        'name'          => __( 'Events', 'my-theme' ),
        'singular_name' => __( 'Event', 'my-theme' ),
      ),
    )
  );
}
Once you have a new custom post type, use WP_Query to display the contents
on the front-end:
<?php
$loop = new WP_Query( array( 'post_type' => 'events' ) );
while ( $loop->have_posts() ) :
  $loop->the_post();
  ?>
  <div class="event">
    <?php the_post_thumbnail( 'post-thumbnail' ); ?>
    <h3 class="event__title"><?php the_title(); ?></h3>
    <div class="event__content">
      <?php the_content(); ?>
    </div>
  </div>
<?php endwhile ?>
For a no-code approach, you can make use of plugins like ACF or Custom Post Type UI to create new post types and taxonomies (tags/categories) from the admin dashboard. Page builders and the block editor gives you the ability to display custom post types and taxonomies.

Custom Fields
Posts typically have a title, author, thumbnail (featured image), and content that you can edit through the classic/block editor. With custom fields, you can attach any arbitrary data to a post.
WordPress natively supports custom fields, but it's only in the form of plain text. When people talk about custom fields in WordPress, they're using plugins that include custom field types like files, dates, check-boxes, images, and colors. ACF (Advanced Custom Fields), Meta Box, Pods, and Carbon Fields are just a few plugins that add these additional custom field types.
You can use custom fields to:
- display the time for an event.
- attach a PDF file for a seminar.
- add an ingredients list to a recipe.
- group books based on genre and length.
- link social media profiles for staff members.
- set relationships between teachers and courses.
- select the condition (new, used, salvage) of a product.
- display the location of a venue and the number of people it could support.
Implementing custom post types, taxonomies, and custom fields to a WordPress website organizes your content in a way that makes it easier to find. Developers can reuse content across multiple pages, and content creators will have a easier time creating and editing their data.
Headless WordPress
Rather than use WordPress to display your front-end, you can separate the website front-end and the content by using WordPress as a headless CMS.
WordPress natively supports a REST API that sends and receives JSON. Sending a
GET request to /wp-json/wp/v2/pages might give you the following response:
[
  {
    "id": 1,
    "title": {
      "rendered": "Hello world!"
    },
    "content": {
      "rendered": "<p>Welcome to WordPress. This is your first post. Edit or delete it, then start writing!</p>\n",
      "protected": false
    },
    // much more data...
  },
  // ...
]
Alternatively, you can query WordPress content using the WPGraphQL plugin. The plugin works well with Gatsby, which is a React framework that embraces the use of GraphQL. But any web framework will work, as long as you can speak GraphQL.
query {
  pages {
    edges {
      node {
        id
        title
        content
      }
    }
  }
}
That query could produce the following JSON response:
{
  "data": {
    "pages": {
      "edges": [
        {
          "node": {
            "id": "cG9zdDo2",
            "title": "Hello world!",
            "content": "<p>Welcome to WordPress. This is your first post. Edit or delete it, then start writing!</p>\n"
          }
        },
        // ...
      ]
    }
  },
By decoupling the front-end and the content, marketers and content creators can use the WordPress admin dashboard to interact with their data. Developers can use familiar SPA frameworks like NextJS, Gatsby, Nuxt, and SvelteKit to design the front-end.
Wrapping Up
One day I'll write a proper conclusion.
That day is not today.